
Introduction to Oyakodon Chicken and Egg Rice Bowl
If you’re searching for a dish that embodies the essence of home-cooked Japanese comfort food, look no further than oyakodon. Translated literally as "parent and child bowl," this delightful meal is a nourishing combination of tender chicken and rich, fluffy eggs, all simmered together in a flavorful, umami-packed sauce. Ideally served over a bed of steaming white rice, it's not just a meal—it's a hug in a bowl.
So why has oyakodon captured the hearts of many? One reason is its simplicity. You can whip this dish up in less than 30 minutes, making it perfect for busy weeknights after a long day at work. It’s also incredibly customizable; whether you opt for traditional chicken or venture into vegetarian territory with alternatives, there’s a variation for everyone. In addition, the experience of savoring each bite combines the softness of the egg and the juiciness of the chicken, leaving you feeling warm and satisfied.
Curious to know how to recreate this classic at home? Let’s dive into the recipe for this Oyakodon Chicken and Egg Rice Bowl, a dish sure to become a staple in your cooking repertoire!
Ingredients for Oyakodon Chicken and Egg Rice Bowl
Essential ingredients for a delicious Oyakodon
Creating a hearty Oyakodon Chicken and Egg Rice Bowl is all about having the right ingredients. Here’s what you’ll need:
- ½ onion: Provides a sweet base flavor.
- 10 oz boneless, skinless chicken thighs: Offers juicy tenderness; for a vegan option, consider plant-based substitutes.
- 3-4 large eggs: The star of the dish for a rich, silky topping.
- ½ cup dashi: A flavorful Japanese soup stock that brings umami depth. You can opt for standard Awase Dashi or a vegan alternative.
- 2 tablespoon soy sauce: Essential for seasoning and color.
- 2 tablespoon mirin: Adds a touch of sweetness.
- 2 teaspoon sugar: Balances the dish perfectly.
Recommended tools for preparation
To whip up your Oyakodon Chicken and Egg Rice Bowl, gather the following tools:
- Chef's knife and cutting board: For easy ingredient prep.
- Rice cooker or Instant Pot: A must for perfect fluffy rice.
- Medium frying pan and oyakodon pan: Ideal for cooking the chicken and eggs to perfection.
- Liquid measuring cup: For accurate seasoning measurements.
For more kitchen tools, check out these recommendations. With these ingredients and tools at hand, you're well on your way to making a comforting Oyakodon!
Step-by-step Preparation of Oyakodon Chicken and Egg Rice Bowl
Creating a delicious Oyakodon Chicken and Egg Rice Bowl at home is not only satisfying but also a culinary journey that embraces comfort food at its finest. Let’s dive into the steps to make this delightful dish right in your kitchen!
Prepare the Ingredients
To kick off your Oyakodon adventure, you'll want to gather your ingredients:
- ½ onion, thinly sliced
- 10 oz boneless, skinless chicken thighs, cut into bite-sized pieces
- 3-4 large eggs, at room temperature
- 1 tablespoon sake, for a touch of flavor
- Fresh mitsuba or green onions for garnish
It's important to prep everything before you start cooking. Trust me—it makes the cooking process smoother! Isn’t it amazing how a little organization can elevate the cooking experience?
Make the Dashi-based Sauce
The soul of your Oyakodon Chicken and Egg Rice Bowl lies in the sauce. Combine ½ cup dashi (Japanese soup stock), 2 tablespoon soy sauce, 2 tablespoon mirin, and 2 teaspoon sugar in a bowl or measuring cup. Stir until the sugar dissolves. This sauce will infuse your chicken and eggs with that much-loved umami flavor. You can find dashi at most Asian grocery stores or even make a simple one at home using kombu and bonito flakes.
Cook the Onions and Chicken
In a medium frying pan, add your onion slices along with the seasoned liquid. Heat this combination over medium heat until it simmers. Add the chicken on top, spreading it evenly. Cook uncovered for about 5 minutes, flipping halfway through to ensure all pieces are evenly cooked. You’ll know it’s ready when the chicken is no longer pink, and the onions are tender and fragrant.
Add the Eggs in Stages
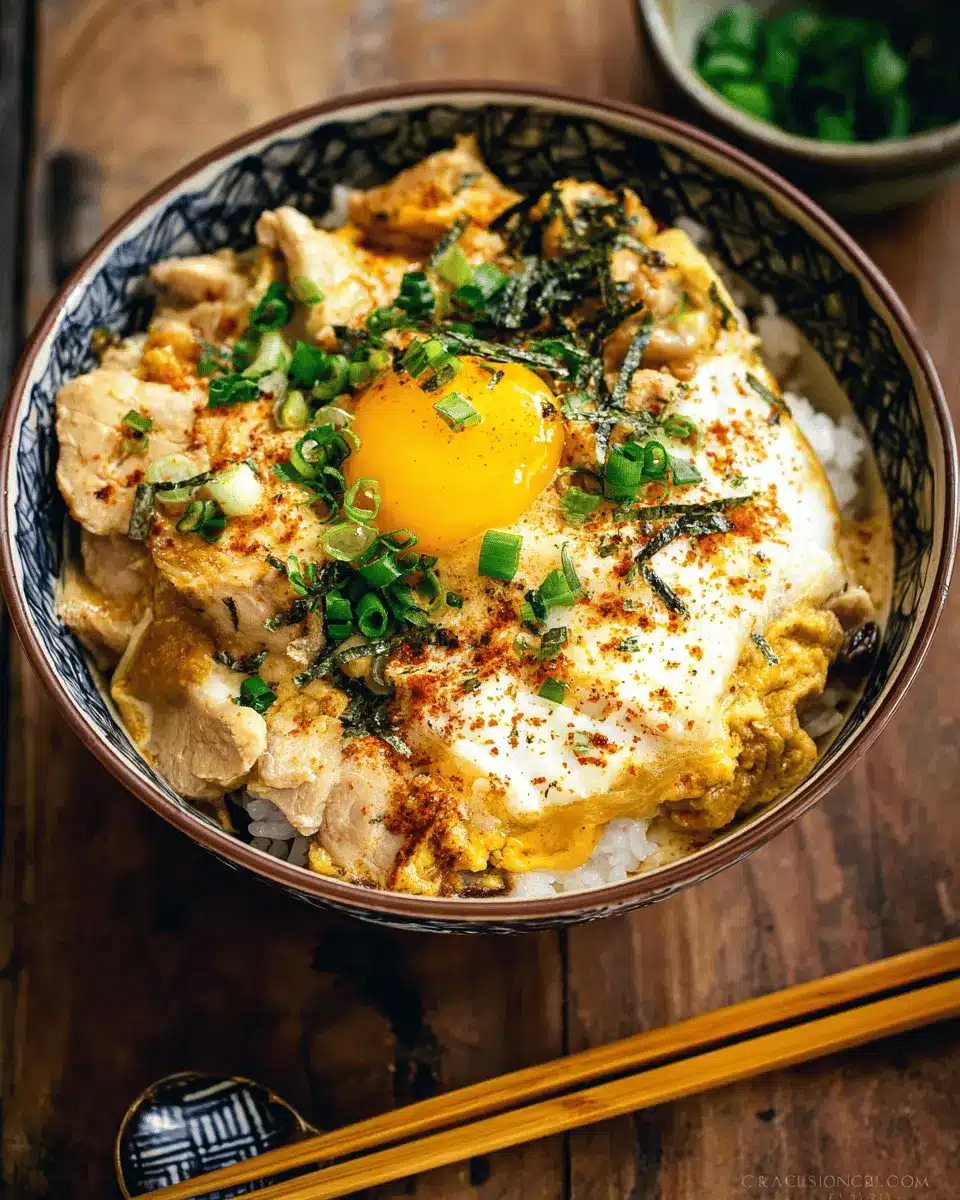
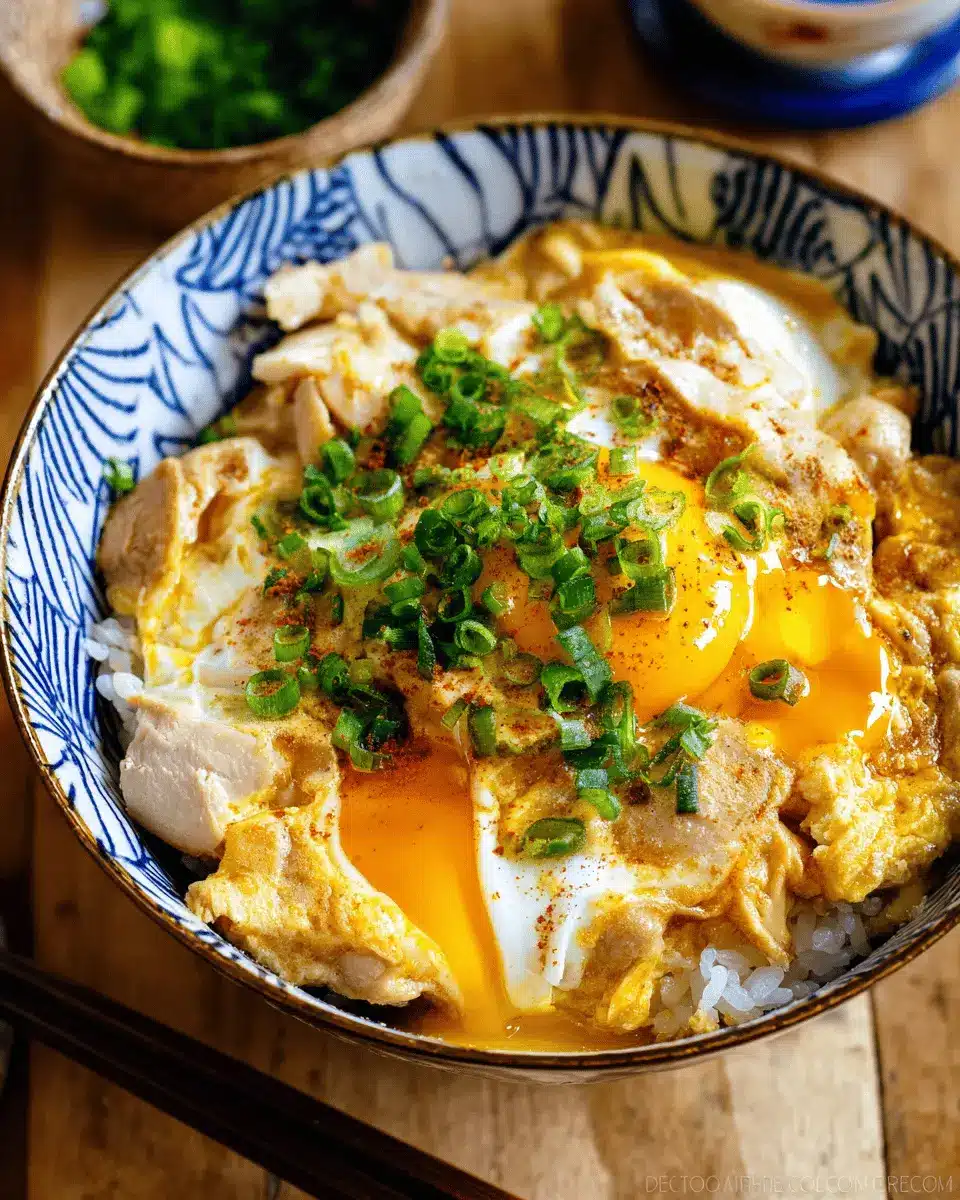
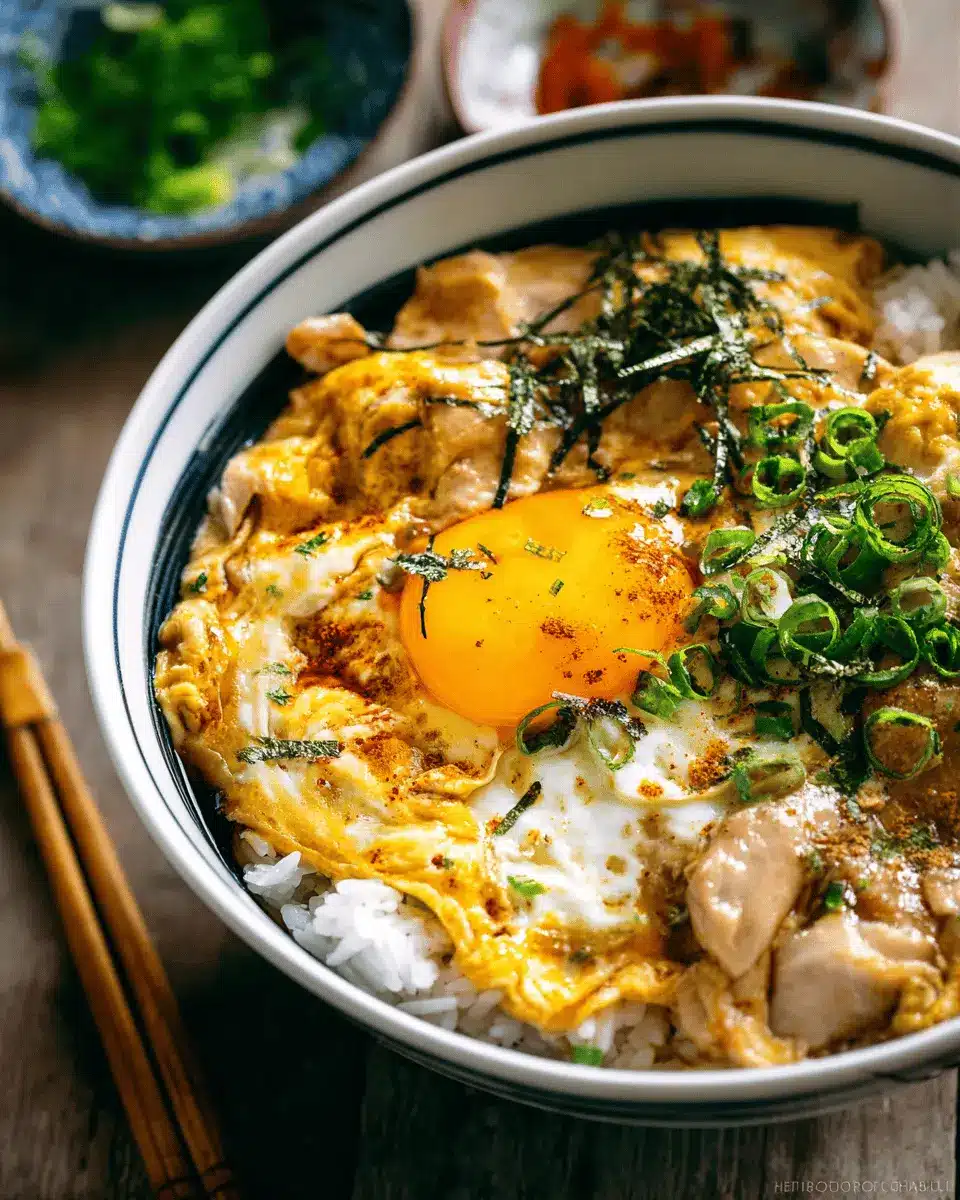
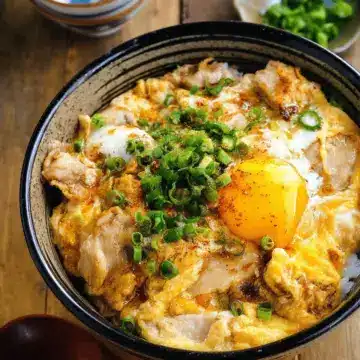
Here’s where the magic happens! Once your chicken is cooked, increase the heat slightly, and drizzle two-thirds of the egg mixture over the chicken and onions. Try to avoid the edges of the pan where it cooks faster. This technique helps keep the yolks runny, enhancing the dish's texture and flavor. When the egg white is barely set, add the remaining eggs and your mitsuba or green onions for that final touch.
Serve Over Rice
Finally, it’s time for the grand unveiling! Serve the fragrant chicken and eggs over steaming bowls of cooked Japanese short-grain rice. Don’t forget to drizzle some of that savory pan sauce over the top. If you’re feeling adventurous, sprinkle some shichimi togarashi or sansho pepper for an extra kick.
There you have it! Your homemade Oyakodon Chicken and Egg Rice Bowl is ready to impress friends or satisfy that comforting craving. Enjoy your culinary creation!
Variations on Oyakodon Chicken and Egg Rice Bowl
Oyakodon with Tofu for a Vegetarian Option
If you’re looking to enjoy an Oyakodon Chicken and Egg Rice Bowl without meat, tofu makes an excellent substitute! Simply replace the chicken thighs with firm tofu, cut into cubes and lightly pan-fried until golden. The tofu absorbs the savory dashi sauce beautifully, ensuring every bite is deliciously satisfying. This twist not only makes the dish vegetarian-friendly but also adds a unique texture that’s sure to impress.
Oyakodon with Different Vegetables
For those who want to experiment further, feel free to add your favorite vegetables! Ingredients like shiitake mushrooms, spinach, or bell peppers bring vibrant colors and nutritional value to your Oyakodon. Just sauté the vegetables with the onions before adding the chicken or tofu for a wholesome, veggie-packed bowl that’s both nourishing and tasty. Visit Japanese Cooking 101 for more inspiration on variations and ingredients!
Cooking Tips and Notes for Oyakodon Chicken and Egg Rice Bowl
Achieving the Perfect Egg Consistency
To get that dreamy, custard-like egg consistency in your Oyakodon Chicken and Egg Rice Bowl, it's crucial not to over-stir the eggs. Instead of scrambling, gently drizzle two-thirds of them over the chicken as soon as the liquid is simmering. This lets the whites set while keeping the yolks beautifully runny. Remember, the key is to cook on a low heat once the eggs are in; this ensures a luscious texture that contrasts with the tender chicken.
Common Mistakes to Avoid
- Skip Overcooking: Avoid high heat once the eggs are added; it can lead to rubbery eggs.
- Avoid Excess Sauce: Ensure you use the right-sized pan so the sauce covers the ingredients without overflowing.
- Balancing the Egg Ratio: Use a mix of egg whites and yolks to maintain that gorgeous visual contrast. Each aspect, from the presentation to the final bite, contributes to that authentic Japanese experience.
For more tips on Japanese cooking techniques, you can check out resources like Nikkei Cuisine or Just One Cookbook. Happy cooking!
Serving Suggestions for Oyakodon Chicken and Egg Rice Bowl
When enjoying your Oyakodon Chicken and Egg Rice Bowl, consider adding some delightful sides and garnishes to elevate the experience.
Ideal sides to complement your meal
Pair your Oyakodon with a light side salad, such as a refreshing cucumber salad or pickled vegetables, which can balance the rich flavors of the rice bowl. A bowl of miso soup is another classic choice; it's comforting and perfect for a cozy meal. If you’re looking for something crunchy, try some edamame sprinkled with sea salt.
Garnishes to enhance flavor
Enhance your Oyakodon’s flavor profile with garnishes like mitsuba (Japanese parsley) or thinly sliced green onions. A sprinkle of shichimi togarashi adds a subtle kick, while Japanese sansho pepper contributes a unique fragrance. These simple additions can make your dish visually appealing and burst with flavor, transforming a hearty meal into a feast for the senses!
Time Breakdown for Oyakodon Chicken and Egg Rice Bowl
Preparation Time
Getting your ingredients ready for the Oyakodon Chicken and Egg Rice Bowl takes about 15 minutes. During this prep phase, you'll slice the onions, chop the mitsuba, and prepare the chicken thighs. Having everything set out will make cooking smoother and more enjoyable!
Cooking Time
The cooking itself is quick and efficient at just 10 minutes. You'll simmer the onions, chicken, and eggs together, creating a wonderfully tasty dish in no time. This fast cooking method allows all the flavors to meld perfectly while keeping the meal light and satisfying.
Total Time
In total, you’ll be looking at around 25 minutes from start to finish. With such a quick turnaround, Oyakodon is perfect for busy weeknights when you want a comforting meal without spending hours in the kitchen. Grab your ingredients, and let’s get cooking!
Nutritional Facts for Oyakodon Chicken and Egg Rice Bowl
If you're curious about what makes this Oyakodon Chicken and Egg Rice Bowl such a hearty meal, here's what you should know about its nutritional profile:
Calories
A serving of Oyakodon totals approximately 537 calories, making it a filling choice without being excessively heavy. Perfect for a busy weeknight!
Protein
Thanks to the chicken and eggs, this dish is packed with 42 grams of protein, supporting muscle health and keeping you satiated longer. It’s a fantastic option for those needing a protein boost.
Sodium
Be mindful of sodium intake! Each serving contains around 1197 mg of sodium, primarily from the soy sauce and dashi. If you're watching your salt consumption, consider using low-sodium soy sauce to lighten things up.
For those who want to dive deeper into the nutritional aspects of your meals, feel free to explore more on healthline.com. Enjoy your cooking!
FAQs about Oyakodon Chicken and Egg Rice Bowl
Can I make Oyakodon ahead of time?
Absolutely! While Oyakodon Chicken and Egg Rice Bowl is best enjoyed fresh, you can prepare the chicken and egg mixture ahead of time. Just store it in an airtight container in the refrigerator for up to 2–3 days. Reheat it gently before serving over freshly steamed rice for a quick meal.
How do I store leftovers?
For the best flavor and texture, place any leftovers of your Oyakodon Chicken and Egg Rice Bowl in an airtight container and refrigerate them. They will stay fresh for about 2–3 days. To reheat, use a microwave in short intervals, adding a splash of water if necessary to maintain moisture.
What can I substitute for dashi?
If you don’t have dashi on hand, consider using homemade vegetable broth or a mixture of water with soy sauce for saltiness. You can also explore options like miso stock for a unique twist. For more information on broth alternatives, check out this insightful article on Broth Basics.
Conclusion on Oyakodon Chicken and Egg Rice Bowl
The Oyakodon Chicken and Egg Rice Bowl is a delightful, soul-soothing dish that perfectly captures the essence of Japanese home cooking. Quick to prepare and rich in flavor, it’s an ideal meal for busy professionals craving comfort food. Why not give it a try tonight? Your taste buds will thank you!
Oyakodon (Chicken and Egg Rice Bowl)
Equipment
- chef's knife
- cutting board
- rice cooker
- Instant Pot
- donabe
- medium frying pan
- oyakodon pan
- liquid measuring cup
- serving bowls
Ingredients
- 0.5 onion onion peeled
- 10 oz boneless, skinless chicken thighs typically 1–2 thighs; use plant-based meat substitute for vegan/vegetarian
- 1 tablespoon sake for marinating the chicken; substitute with Chinese rice wine or dry sherry, or omit
- 3-4 large eggs at room temperature; for vegan/vegetarian, use egg substitute such as JUST Egg
For the Seasonings
- 0.5 cup dashi (Japanese soup stock) use standard Awase Dashi, dashi packet or powder, or Vegan Dashi
- 2 tablespoon soy sauce
- 2 tablespoon mirin
- 2 teaspoon sugar
For Serving
- 2 servings cooked Japanese short-grain rice typically 1⅔ cups (250 g) per donburi serving
- 4 sprigs mitsuba (Japanese parsley) or green onion/scallion
- to taste shichimi togarashi (Japanese seven spice) optional
- to taste Japanese sansho pepper optional
Instructions
Before You Start
- Gather all the ingredients. Do not make more than two servings in a medium frying pan.
To Prepare the Seasonings
- Combine ½ cup dashi, 2 tablespoon soy sauce, 2 tablespoon mirin, and 2 teaspoon sugar in a bowl or a liquid measuring cup and mix until the sugar is dissolved.
To Prepare the Ingredients
- Slice ½ onion lengthwise, about ¼ inch (6 mm) wide.
- Chop 4 sprigs mitsuba into ½ inch (1.3 cm) pieces.
- Trim the extra bits of fat from 10 oz boneless, skinless chicken thighs.
- Cut the chicken thigh into strips and then into pieces about ¾–1 inch (2–2.5 cm) square.
- Transfer the chicken to a bowl and sprinkle with 1 tablespoon sake. Set aside for 5 minutes.
- Crack 3-4 large eggs into a bowl and lift the egg whites to 'cut' them into smaller clumps.
To Cook the Oyakodon in a Medium Frying Pan
- With the stove off, add the sliced onions to a medium frying pan. Add the seasonings mixture.
- Turn on the heat to medium and bring it to a simmer. Once simmering, add the chicken on top of the onions.
- Cook, uncovered, for 5 minutes or until the chicken is no longer pink and the onions are tender.
- Add two-thirds of the eggs in a circular pattern over the chicken and onions.
- When the eggs are still runny but just set, add the rest of the eggs and mitsuba on top.
- Serve the cooked chicken and egg mixture over steamed rice.
To Cook the Oyakodon in an Oyakodon Pan
- Cook the chicken and egg in two batches, one serving at a time.
- With the stove off, add half of the sliced onions to the oyakodon pan with half of the seasonings mixture.
- Cook, uncovered, for 4 minutes or until the chicken is no longer pink.
- Add two-thirds of the eggs over the chicken and onions.
- When the eggs are still runny but just set, add the rest of the eggs and cook until done.
- Serve over cooked rice.
Leave a Reply