
Introduction to Chocolate Cake Pops
Chocolate cake pops are not just a dessert; they're a delightful experience, especially for young professionals navigating the hustle of daily life. Why? Because they're the perfect portable treat! Picture this: You can indulge in these little bites of joy while on the go, making them an ideal companion during busy workdays or social gatherings.
Crafting these delicious confections from scratch, as you'll see in our full recipe, is a rewarding endeavor. You start with a homemade chocolate cake, blend it with rich chocolate frosting, and finish with a generous coating of melted chocolate. Trust me, the process is as enjoyable as the outcome, and it offers a fantastic way to unwind after a long day.
In a world where convenience often reigns, these chocolate cake pops allow for a personal touch. Whether you're treating a colleague or bringing them to a gathering, these cake pops make a statement. Plus, they’re adaptable—you can customize them with various toppings or flavors! So grab your apron and let's embark on a sweet journey. Explore more on how to master this delicious treat with our full recipe here.

Ingredients for Chocolate Cake Pops
Creating chocolate cake pops from scratch is both fun and rewarding! Here’s a breakdown of the essential ingredients to get you started.
Main Ingredients for the Cake
To whip up a delicious chocolate cake base, you'll need:
- All-purpose flour (1 cup) - This forms the structure of your cake.
- Granulated sugar (1 cup) - Sweetens everything perfectly.
- Unsweetened cocoa powder (6 tablespoons) - Adds that rich chocolate flavor.
- Baking soda (½ teaspoon) - Helps your cake rise.
- Salt (¼ teaspoon) - Balances the sweetness.
- Canola or vegetable oil (½ cup) - Keeps the cake moist.
- Large eggs (2) - Binds all the ingredients together.
- Pure vanilla extract (1 teaspoon) - Enhances the flavor.
- Hot water (½ cup) - Ensures a moist cake.
Ingredients for the Frosting
For a luscious frosting that complements your cake pops, gather:
- Unsalted butter (6 tablespoons) - A creamy base for your frosting.
- Confectioners’ sugar (¾ cup) - Adds sweetness and texture.
- Cocoa powder (½ cup) - For that rich chocolatey taste.
- Heavy cream or milk (2-3 teaspoons) - Adjusts the consistency.
- Pure vanilla extract (½ teaspoon) - Adds depth.
Coating Requirements
Finally, to give your cake pops that beautiful finish, you'll need:
- Candy melts (24 ounces) - Easy to melt and dip.
- Sprinkles - For added fun and decoration.
By following these ingredient guidelines, you're well on your way to creating delightful chocolate cake pops that everyone will love! Remember, for additional tips and tricks, check out Sally's Baking Addiction. Happy baking!
Preparing Chocolate Cake Pops
Making chocolate cake pops can be a delightful way to elevate your dessert game. They're not only visually appealing, but they pack a chocolate punch in every bite! Let’s break down the process step by step, ensuring it's easy to follow and fun to make.
Preheat and Prepare the Baking Pan
First things first, preheat your oven to 350°F (177°C). While the oven is warming up, grab your 9-inch baking pan (a round or square one will do) and grease it generously. This will prevent your cake from sticking and ensure a clean release after baking. If you want even easier handling, consider lining it with parchment paper as well.
Make the Chocolate Cake
In a large mixing bowl, whisk together the all-purpose flour, granulated sugar, cocoa powder, baking soda, and a pinch of salt. In a separate medium bowl, vigorously mix the oil, eggs, and vanilla extract until well combined. Your chocolate cake batter should come together nicely when you pour the wet ingredients into the dry mix, followed by hot water. Make sure to combine everything well, eliminating any dry pockets.
Once your batter is ready, pour it into the prepared pan and bake for 25-27 minutes, or until a toothpick inserted comes out clean. Set the baked cake on a wire rack to cool completely.
Prepare the Chocolate Frosting
While waiting for the cake to cool, it’s the perfect time to whip up that luscious chocolate frosting. Using either a handheld mixer or a stand mixer, cream the butter on medium speed for about two minutes. Scraping down the sides can be helpful to ensure everything is well-mixed. Add the confectioners’ sugar, cocoa powder, and vanilla extract—mix initially on low before ramping up to high speed for about three minutes, until smooth. Adjust the consistency with heavy cream if necessary.
Combine Cake Crumbs and Frosting
Once your cake is cool, crumble it into fine pieces in a large bowl. This is where the magic happens: add the chocolate frosting to the crumbled cake. Mix them together on low speed until fully combined. The texture should be moist but moldable, perfect for shaping into balls.
Form the Cake Balls
Grab a tablespoon measure (about 1 scant Tablespoon or 20g) of the moist cake mixture and roll it into a ball. Place your cake balls on a lined baking sheet. Once all are formed, refrigerate for 2 hours or freeze for 1 hour to firm them up. This chilling stage ensures your chocolate cake pops maintain their shape when you dip them.
Melt the Coating and Dip the Cake Balls
For the coating, melt your chosen chocolate in a measuring cup using the microwave in 20-second increments. Stir in between until it’s smooth. Allow it to cool slightly; dipping warm balls right into hot chocolate can cause cracks in the coating.
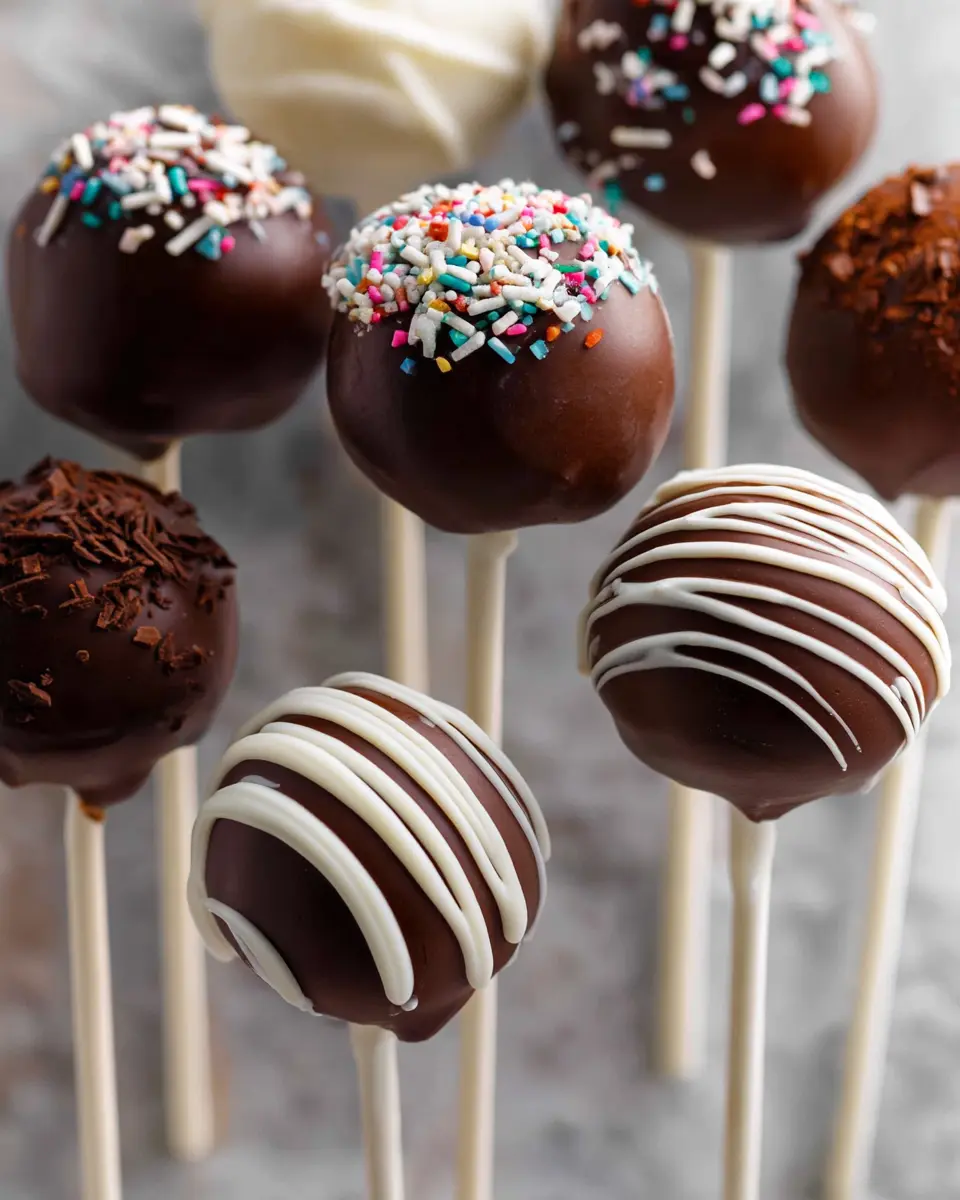
When you’re ready, take 2-3 cake balls out of the fridge at a time. Dip one end of a lollipop stick into the melted chocolate, then insert it into the center of the cake ball. Dip the whole ball into the coating, ensuring a full coverage, and let the excess drip off. Finally, add sprinkles if desired before placing the cake pops upright in a styrofoam block to set.
With these steps, you’ll create delectable chocolate cake pops that are sure to impress! Enjoy this fun culinary project and share the results with friends and family.
Variations on Chocolate Cake Pops
Alternative flavors for cake pops
Why stick to just the classic chocolate when you can explore alternative flavors for your cake pops? Try a vanilla or strawberry cake base for a fruity twist. For a gourmet touch, consider adding espresso or matcha to your cake batter. Don't forget about fillings! A raspberry or cream cheese filling can elevate your pops to a whole new level. You can even layer different flavors together for a marbled effect.
Creative decorating ideas
Get creative with how you decorate your chocolate cake pops! Instead of traditional sprinkles, try crushed nuts, coconut flakes, or edible glitter for an eye-catching finish. Dip the tops in white chocolate and use colored fondant shapes or themed candies to match your occasion. For a textured look, drizzle melted chocolate over the tops or even use a piping bag for decorative designs. The possibilities are endless, and it’s a great way to express your style!
For more inspiration, check out expert decorating tips from sources like Food Network and Taste of Home. Happy decorating!
Baking notes for Chocolate Cake Pops
Tips for achieving the perfect texture
To create delightful chocolate cake pops, focus on texture for an enjoyable bite. Here are some essential tips:
- Moisture balance: Ensure your cake isn't too dry—you’ll want to achieve a moist crumb. Take care during mixing; overmixing can lead to dryness. A gentle hand is key!
- Chill properly: After shaping the cake balls, chill them for at least two hours. This will make them firmer and easier to dip in melted chocolate.
- Correct coating temperature: When dipping, let the melted chocolate cool for a few minutes. Hot chocolate can cause cracking, so aim for a warm, but not sizzling, temperature.
For more baking techniques, check out King Arthur Baking for expert tips!

Serving suggestions for Chocolate Cake Pops
Creative ways to serve cake pops
Serving chocolate cake pops can be as fun as making them! Here are some creative ideas to elevate your presentation and impress your friends:
-
Themed Displays: Match your cake pops to your event theme. Use colored sprinkles to match birthday party colors or seasonally inspired decorations for holidays.
-
Individual Treat Bags: Wrap each cake pop in a clear cellophane bag tied with a ribbon. This not only makes for a lovely gift but also keeps them fresh!
-
Cake Pop Bar: Set up a DIY station where guests can customize their cake pops with various coatings and toppings like nuts, coconut, or edible glitter.
-
Dessert Table: Incorporate your chocolate cake pops on a beautifully arranged dessert table alongside other treats like cookies and mini cupcakes.
For more festive ideas, consider browsing resources from the Food Network or Pinterest. Happy serving!
Tips for Making the Best Chocolate Cake Pops
Common Mistakes to Avoid
To ensure your chocolate cake pops turn out perfectly, steer clear of common pitfalls! Firstly, don’t skip letting your cake cool completely. A warm cake can lead to a gooey mess when mixed with frosting. Also, avoid overworking the cake mixture; just mix until combined to keep your pops tender. Finally, make sure your coating isn’t too hot when dipping, or you’ll end up with cracks.
Essential Tools for Success
Having the right tools can make all the difference. Use a sturdy measuring cup for melting chocolate—this makes dunking hassle-free. A silicone baking mat or parchment paper can simplify cleanup and help your pops stay in shape. And don’t forget the lollipop sticks; they’re essential for that classic cake pop experience! For more tools, check out Sally’s recommendations.
Time details for Chocolate Cake Pops
Preparation Time
Making these delightful chocolate cake pops requires about 2 hours of preparation. This includes baking the cake and allowing it to cool completely before crumbling and mixing with frosting. It’s a great time to gather friends for some fun and share the baking responsibilities!
Cooking Time
The actual cooking time for the cake is 26 minutes. Keep an eye on it! A toothpick should come out clean when it's ready. This step is crucial for that perfect texture in your cake pops.
Total Time
In total, you’ll need approximately 7 hours. This includes chilling time for the cake balls and allowing the coating to set once dipped. Plan ahead and enjoy this process; these pops are worth the wait!
For more insightful tips on baking times and techniques, check out resources like King Arthur Baking or Serious Eats to elevate your confectionery skills!
Nutritional Information for Chocolate Cake Pops
Calories
Each chocolate cake pop contains approximately 150 calories, making them a delightful treat without too much guilt. Perfect for parties or a mid-afternoon pick-me-up, right?
Protein
You’ll find around 2 grams of protein in each chocolate cake pop. While not a significant source, it adds a little nutritional boost to this fun dessert!
Sugar Content
With about 10 grams of sugar per cake pop, these sweet bites are undeniably indulgent. Enjoy them in moderation to satisfy your sweet tooth while keeping your health goals in check. For more detailed nutritional insights, check out resources like the USDA FoodData Central.
FAQs about Chocolate Cake Pops
How long do chocolate cake pops last?
If stored properly, chocolate cake pops can last for up to one week in the refrigerator. Simply keep them in an airtight container to maintain freshness. If you're planning to enjoy them later, follow the freezing tips below!
Can I freeze cake pops?
Absolutely! You can freeze cake pops for up to six weeks. Just make sure they’re fully set and placed in an airtight container or freezer bag. When you're ready to indulge, thaw them overnight in the refrigerator to keep that delicious texture intact.
What if my coating keeps cracking?
Cracking is often due to temperature issues. Ensure that the coating isn't too hot when dipping. Let it cool for a few minutes after melting, and always work with cold cake balls. If you’re still having trouble, try adding a bit of vegetable oil to your melted chocolate for a smoother consistency. For more tips on cake pop perfection, check out reputable baking resources like The Spruce Eats or Serious Eats.
Conclusion on Chocolate Cake Pops
In summary, chocolate cake pops are a delightful treat that can be enjoyed by anyone—from kids to adults! With a little creativity and care, you can create a dessert that not only tastes amazing but also looks stunning. Remember to experiment with flavors and toppings to make them truly yours! For more delicious recipes, check out Sally's Baking Addiction for inspiration.

Chocolate Cake Pops
Equipment
- 9-inch round pan
- Electric mixer
- Glass Mixing Bowls
- Whisk
- baking sheet
- silicone baking mat
- Glass Measuring Cup
- double boiler
- Lollipop Sticks
Ingredients
Cake Ingredients
- 1 cup all-purpose flour (spooned & leveled)
- 1 cup granulated sugar
- 6 Tablespoons unsweetened cocoa powder (⅓ cup + 1 Tbsp)
- ½ teaspoon baking soda
- ¼ teaspoon salt
- ½ cup canola, vegetable, or melted coconut oil
- 2 large eggs at room temperature
- 1 teaspoon pure vanilla extract
- ½ cup hot water
Chocolate Frosting Ingredients
- 6 Tablespoons unsalted butter (softened to room temperature)
- ¾ cup confectioners’ sugar
- ½ cup unsweetened cocoa powder (natural or Dutch-process)
- 2-3 teaspoons heavy cream or milk
- ½ teaspoon pure vanilla extract
Coating Ingredients
- 24 ounces candy melts (or semi-sweet chocolate bars)
- sprinkles
Instructions
Preparation Instructions
- Preheat oven to 350°F (177°C). Grease a 9-inch pan (round or square) or 9-inch springform pan.
- Make the cake: Whisk the flour, granulated sugar, cocoa powder, baking soda, and salt together in a large bowl. Set aside. Whisk the oil, eggs, and vanilla together in a medium bowl. Pour the wet ingredients into the dry ingredients, add the hot water, and whisk everything together until combined.
- Pour the batter evenly into the prepared pan. Bake for 25–27 minutes or until a toothpick inserted comes out clean. Allow the cake to cool completely in the pan on a wire rack.
- Make the frosting: Beat the butter on medium speed until creamy, about 2 minutes. Add confectioners’ sugar, cocoa powder, 2 teaspoons of heavy cream/milk, and vanilla extract, and beat on low speed until incorporated. Increase to high speed and beat for 3 minutes until it comes together.
- Crumble the cooled cake into the bowl with frosting. Beat the frosting and cake crumbles together until combined.
- Measure 1 scant Tablespoon (20g) of moist cake mixture and roll into a ball. Place cake balls on a lined baking sheet. Refrigerate for 2 hours or freeze for 1 hour.
- Melt the coating in a 2-cup liquid measuring cup in the microwave, stirring every 20 seconds until completely melted. Let the coating cool for a few minutes.
- Coat the cake balls: Remove 2–3 cake balls from the refrigerator at a time. Dip one end of a lollipop stick into the coating and insert it into the center of a cake ball. Dip the cake ball until covered, tap off excess coating, and decorate with sprinkles.
- Coating will set within an hour. Store cake pops in the refrigerator for up to 1 week.

Leave a Reply